Thursday, September 24, 2015

1930's dress for the Historical Sew Monthly June, just a few months late...

It's been a long time since I posted! I feel like the last few months just went by in a blur. The end of summer always seems to be that way, trying to fit in as much as possible before fall comes I guess. I'm so excited for fall, and holidays coming up! But before I say goodbye to summer completely, I have to post my Historical Sew Monthly for June! I know, so sad that it's taken me this long to post, especially since it was actually finished on time by the end of June. Anyway, the challenge for June was "Out of your comfort zone" to sew something from a time period never attempted before. I started to look into the 1920s-30s, a couple of decades I have not tackled before, and as my sister happens to love with the fashion of the 1930's I decided to make her my guinea pig and make a day dress for her from that era, which was perfectly alright with her! We researched patters and originals until she had found the dress she liked, of course it wasn't one with a pattern, it was an original 1930's dress for sale on Etsy, so of course I would have to make my own pattern. We got lucky and Fabric.com was having a retro pattern sale, so we ordered some retro print cotton and I set to work. Again, I meant to take pictures of the construction process as well as finished work, but I get so zoned in when I'm sewing I never can seem to remember to stop and take a photo. Below is a picture of the original dress that we decided to recreate.


It really is a nice shape and easy to dress up or down, which is what she wanted. I was super excited too because I had a bunch of 1930's shell buttons to use for the front in my button stash just waiting for an item like this. So, after a day of pattern drafting I came up with what I decided was a workable pattern. Really the bodice was the only problem, smocked shoulders and a tucked waist, the skirt was pretty simple. Once the pieces were all cut out they went together much easier than I expected as I have never actually tried my hand at smocking before. Here are some photos of the finished dress. 


I did shorten the sleeves a bit at my sister's request, otherwise, I think it does the original justice. Now, on to the particulars...

The Challenge:  Out of your comfort zone
Fabric:  Retro print cotton from Fabric.com
Pattern:  My own 
Year:  1930's
Notions:  Vintage 1930's buttons, thread
How historically accurate is it?  I'd say it definitely looks accurate, though I don't know how exact the construction is. 
Hours to complete:  About 4 probably? More if you count the pattern drafting. 
First worn:  By my sister sometime in the end of June. 
Total cost:  $24 for fabric, buttons from my stash.
I'm sure it's not surprising that I didn't even attempt the challenges from July, August, or September. Now, technically I've still got a few days to work on something for the September challenge which is "Color Challenge Brown". I may think of something I could whip up, but if not I hope to be back for October's challenge, "Sewing Secrets". And I do hope to be posting more often during the next few months, as I'm sure I'll be working on some crafty things with my kids for the holidays. Until next time! 


Wednesday, June 17, 2015

All dressed up for our first Civil War Reenactment!

     This past weekend we attended our first Civil War Reenactment at Hulston Mill in Dade County, Missouri! I was a little worried that I wouldn't be able to finish everything in time. Here is our family portrait!


     I didn't have time to finish anything for my husband, though I don't think he minded, I'm still talking him into this whole reenactment thing. When we left and I asked my little girl if she wanted to do it again she said, "Yes, and Daddy do it too." Let's see him say no to her, haha!
     And now, the dress. I literally finished it Friday, the day before. I sewed on the collar at 10pm, much too close for comfort. I decided to sew it all by hand, which is why it took longer than I had expected. It is completely hand sewn except for two of the skirt seams which I had to machine sew for time's sake. I used the Simplicity 4551 pattern and had to do more adjustments than I expected as well. Since the fabric I was using was a sheer cotton, I ended up cutting the neckline on the under bodice much deeper so that it just covered the chemise, as was common. Also, I piped the neckline and armsycles, which both had to be adjusted. Part of the problem was that the pattern only went down to an 8 and I usually go with a size 6 for historical garments, since the 2 inch ease built into most modern patterns is not historically accurate. I had to reshape the sleeves and front bodice gathers as well, as the pattern pieces were just not shaped right. I also modified the front closure so that the under bodice closed separately of the bodice front, as was shown in several of the bodices I've researched. I did plan on using buttons for the front closure, but ended up using hook and eyes as I didn't have enough time to hand sew eleven button holes. The good news was that I ended up liking that closure better! And I even had an antique locket pin that was my great-grandmothers to wear at the neckline, which looked pretty accurate.
     The skirt is cartridge pleated to a cotton twill waistband and then sewn to the bodice. It uses a dogleg closure on the left front, which actually didn't take me as long as I thought it would to figure out. I was so happy with the final result! It would have been nice to have a hoop to wear with it, but the corded and regular petticoats I wore under it added a decent amount of fullness, and were historically accurate. Here are a couple more shots of the dress. 


     The bright pink water bottle really is the finishing touch don't you think? heehee. I was very glad I brought my pinner apron along as well, since we ended up eating lunch there and it started raining just before we left. 


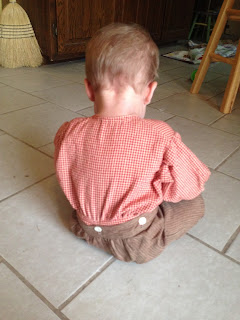
    And a shot of the good Confederate boys in their garb. My little boy kept trying to run off and join them! I was so happy that I was able to finish a little outfit for him as well! The shirt is a cotton gingham and the trousers are made from a brown, striped linen, with bone and shell buttons. The shirt buttons up the front and to the trousers at the waist band. 


     So, now on to the next adventure! I have a couple of things that I would like to get started on. One is for the June Sew Monthly Challenge, a 1930's dress for my sister; and the second is a Tudor gown. I did mean to post some pics of the 1860's dress at various levels of construction, but never found the time, so I'll try to be better about that with the next projects! 


Friday, May 29, 2015

May Sew Monthly Challenge

I am finally able to sit down and blog about my Sew Monthly Challenge for May! The challenge was "Practicality," so I made a pinner apron to wear with my Civil War ensemble. It was finished at least a week ago, but I just haven't had time to take pictures and blog. Here is the finished piece.


The last photo is a close up of the hand stitching on the pocket. This is entirely hand sewn, my first completely hand stitched piece! I am very excited about that! Now on to the challenge particulars.

The Challenge:  Practicality
Fabric:  100% cotton from my stash
Pattern:   My own
Year:  1860's
Notions:  cotton thread, cotton muslin for interfacing at waistband
How historically accurate is it?  Since I managed to completely hand sew this one, I would say it is 100% accurate (or as close as it gets in this day and age). 
Hours to complete:  about 4 hours
First worn:  as of now, only by my dress form!
Total cost: $0 
I have also been working on a petticoat to go over the corded petticoat. This one is also completely hand stitched! I guess doing the apron made me want to challenge myself. It has two tucks at the hem, and has stroked gathers at the waistband. 

A close up of the Stroked Gathers...

Now all I have to do is starch and iron them! And make the day dress to go over them of course! Since I am using a commercial pattern I am currently working on a muslin mock up of the bodice so I can work out any kinks. I plan to try on the entire under clothes ensemble as soon as I can get someone to help me with the corset! I still can't seem to get it laced tightly enough on my own. I think my husband may have to learn a bit about it this weekend, ha ha! My deadline for the dress is the middle of June, so you should be hearing about it soon!

Friday, May 8, 2015

April Sew Monthly Challenge

April's Challenge is finished, I can't believe I am all caught up! The challenge for the month of April was "War and Peace", to make something that shows extended times of war or peace. My submission is a corded petticoat. I originally made this particular petticoat a year or so ago for someone larger in the waist than myself, and decided to take it in to fit my measurements.


During the Civil War fabric, notions and, well, most things were hard to come by especially in the South, so it makes good sense that if someone in the family had an extra petticoat, and another member needed one, it would most likely be redone to fit the new recipient. Below is the finished petticoat with a waist measurement of 22 inches (decreased from about 26 inches), and a 90 inch swing. It has 6 rows of cotton cording, which I would like to add more to for historical accuracy, but I plan on starching the petticoat first to see how much body it will give as is. I plan on wearing two fully starched petticoats over it, so hopefully that will give me the body I want under my dress as I just don't have the funds right now for hoop boning. 


The Challenge:  War and Peace
Fabric:  White cotton muslin
Pattern: My own
Year:  1860's
Notions:  Cotton cording, cotton thread, hook and bar
How historically accurate is it?:  Most of it is machine sewn, so that is definitely not authentic, and it should have more rows of cording, but otherwise, corded petticoats were still common in the 1860's especially for the working class, so I'll give it 50%
Hours to complete: less than 1 hour, as I only had to re-gather the waist
First worn:  Hasn't been worn yet
Total cost: $0

Thursday, May 7, 2015

March's Sew Monthly Challenge: Stashbusting

As I wrote earlier, I had planned on making an 1860's day dress for this challenge, but lack of time to make all the appropriate under things has put that on hold. I have finished my corset, chemise, and drawers, and have a corded petticoat that I should be able to pull in at the waist to fit my measurements (perhaps a entry for April's challenge: War and Peace?), but still need at least two more petticoats for a period correct look. So, instead I finished an ensemble for my daughter. It consists of a pair of drawers, underskirt, and dress. The dress was made using cotton material also given to me by my husband's grandmother and is based on a surviving dress from the 1860's. The first photo is of the original dress, and below my beautiful daughter modeling my recreation.


I just realized that I had her try the dress on before I had finished hemming the sleeves, which is why one looks longer than the other in the photo. They are both hemmed now. The back closes with four shell buttons and hand sewn button holes. And below, a picture of the underskirt and drawers. 


While the dress I drafted myself, the drawers and underskirt were made from Butterick 5901, with major tailoring, since historical commercial patterns always end up much larger than the measurements state on the pattern jacket. I added two extra tucks to the drawers and made the tucks on the underskirt deeper, which gave it some body almost like a corded petticoat. So, for the Dreamstress's March Sew Monthly Challenge, a child's civil war era dress. 

The Challenge:  Stashbusting
Fabric:  Cotton fabric
Pattern:  My own draft
Year:  1860's
Notions:  Cotton Thread, antique shell buttons
How historically accurate is it?:  This one is pretty close. The sleeves, hem and decorative tuck are all hand sewn, as were the button holes at back closure. I'd give this one about 80% as the bodice was machine sewn. 
Hours to complete:  8-12? again, I should be better about keeping track!
First worn:  for pictures on May 1st
Total cost:  $0 

The Corset is Completed!

My 1860's corset is finally completed! After researching several surviving corsets from the era I decided to cut down on the number of bones the pattern called for, as I didn't see any that seemed to have that many boning channels. The finished corset has 16 bones and a front busk closure. It laces up the back with 30 metal grommets and is hand flossed with silk embroidery floss. The color is not as blue as I wanted, the color was listed as "light periwinkle," but is much closer to purple than blue as you can see in the picture below.


The embroidery at front busk is based on an 1880's corset, and I also found an 1820's corset with similar scroll work. I am wearing it over my 1860's chemise, which is now complete with buttons! The waist measurement in this photo is 23 inches, a reduction of about 2.5 inches. Unfortunately the back closure met at the top and was only about an inch apart at the waist. I really wanted a waist measurement of 22 inches while still having a 2 inch gap or so in the back lacing so I ended up taking it in at the waist and bust after the photos were taken. The miss fit was the product of not having anyone to help me try on the corset properly, (as my husband has no idea how such things work) and I just can't seem to tighten it enough by myself. And I may have been rushing a bit to get it done... proof that it pays to do it right the first time. Though it probably only took me an hour or so to fix, as I luckily only had to take out two seams and re-floss two bones. 


I was a little worried about how it would feel sitting down, but it turned out to be very comfortable to sit in! So much easier to keep from slouching ;) Below is a close up of some of the flossing. 


So, January's and February's Sew Monthly Challenges are finished! I also have finished March's challenge, but I will post it in a second blog. 

The Challenge:  Colour Challenge Blue
Fabric:  White cotton twill with Light Periwinkle Silk Embroidery
Pattern:  Simplicity 9769, with adjustments
Year:  1860's
Notions:  Metal grommets, spring steel, cotton thread
How historically accurate is it?:  Other than the machine sewing I think it is pretty accurate. I decreased the amount of boning to match a surviving corset from the era. I haven't seen that particular color of floss, but I did see shades of blue, which is what I had wanted the floss to be. So, maybe 70% due to the machine sewing? 
Hours to complete:  I am always so bad at keeping track of this... maybe, 10 hours? I'm always sewing for a few minutes here and there at nap times so it's hard to keep track of. 
First worn:  For the pictures on May 2nd. 
Total cost:  $14 for twill and thread, the busk, grommets, and steel I already had in my stash. 


Saturday, April 18, 2015

April 18th, First Personal Goal due

So, April 18th is here. I had hoped to post sometime between the last post and this date with in progress photos of the three items I've been working on, but couldn't seem to find the time. But, since I have not managed to perfectly meet my goal for this date, I'll post in progress now.


First up, my Chemise. It is almost completely finished, the only thing left is to sew the buttons and loops at the front neck closure. I have two vintage bone buttons for it that were probably made in the 1930's, but are of the same look and material as those made in the mid 1800's. So I am pretty much on schedule with this one. It is not completely hand sewn, as was my intention. Time was really a problem here, so I ended up machine stitching the side panels and neckline, though the hem, sleeves, and armhole facings are all completely hand sewn. It is made from cotton muslin and cotton thread with flat felled seams. I would guess it is about 50% accurate due to the fact that it is partially machine sewn. Although I have found a couple of surviving dresses from the 1860's that were machine sewn, it would be very rare to find a machine sewn chemise.


On to the drawers. These are also made from cotton muslin and cotton thread, with the traditional split crotch. They are mostly machine sewn, again out of time concerns, but the drawstring casing and tucks at the hem are hand sewn. So, again, maybe 50% accurate. As you can see from the picture I have one tuck left to sew at the right hem, and they are missing the drawstrings at back, only because I can't find any proper cotton cord, so I will have to order some. Here is a close up of the hem.


So, the drawers and chemise are pretty much good to go, as for the corset, that's another story. As of 10pm this evening this is what my corset looks like. 


All the grommets are set, as is the loop part of the busk. The stud half is still in progress. I have not flat felled the seams yet or added boning as I want to lace it up and make sure I don't need to make any more adjustments before the bones go in. When it is finished I believe it will have 20 steel bones plus the busk at the front. It is made with two layers of white cotton twill and machine sewn with cotton thread. I felt better about machine sewing this article due to the fact that there were corset companies at the time. Unfortunately, once the rest of the basic construction is finished I still have to embroider the thing! So, I'm definitely behind on this. The good news, though, is that I can still move on to the next goal as soon as the basic silhouette is accomplished, so I can finished the embroidery as I have the time. I will be using a pure silk thread in light periwinkle for the embroidery, which I also had to order as it is impossible to get in any fabric/craft store in my area. 

All in all, I am pretty pleased with the progress, especially as 80% of what is done I did just this week (Yes, I procrastinated a little). But, that is why I have set these goals, to help myself be better at getting these projects done. I will focus on finishing the corset in the next few days, and after that it is on to the next challenge... petticoats! I will try to get a pick of everything on once the corset is finished. 

Friday, April 3, 2015

     After doing some research over the last couple of days I have decided to go with Simplicity 9769 for chemise, drawers, and corset. I'll be using 100% cotton muslin for the chemise and drawers, and 100% cotton twill for the corset, since coutil is just not sold in any fabric stores near me. One modification I will be making is to lengthen the drawers so they come closer to the ankle.
     I have also settled on Simplicity 4551, dress B, as it seems to be fairly historically accurate for a Simplicity pattern. I will only have to make a couple modifications for historical accuracy, for example, piping the waist, armsycle, and neckline.
     I will also be participating in The Dreamstress's Historical Sew Monthly 2015. You can check her website out here. She has set different challenges for every month in 2015. I'm a little behind, but I hope to catch up in the next month! January's challenge was "Foundations" for which I will be making the 1860's chemise. February's challenge was "Colour challenge blue" for which I will be making the 1860's corset in white with blue hand embroidery. March's challenge was "Stashbusting", to make something out of fabric, trim etc. that you already have on hand, for which I will be making my 1860's day dress out of vintage cotton fabric my husband's grandmother gave me last year. And April's challenge is "War and Peace", to make something that shows the influence of long periods of either war or peace. I am thinking I will make a civil war era petticoat out of an old cotton flannel bed sheet. I do plan on working in different eras for the other challenges, but since I need my Civil War ensemble by June, I figure I may as well find a way to fit them into the challenges!
      So, personal goals, to finish January and February's challenges plus 1860's drawers by April 18th, and to finish March and April's plus 1-2 basic petticoats no later than May 16th. That should put me back on track with the Sew Monthly Challenges. Though, I will probably be making the petticoats first and the March challenge dress last. I will post pics soon, as I hope to start this weekend! Happy Easter!

Tuesday, March 31, 2015

     Welcome to Returning Vintage! I have created this blog to have a place to post about my attempts to recreate my favorite vintage clothes from regency to the 1960's. A little about me, I started costuming in my teens when my mother ran a children's theater, and from there have morphed into historical sewing, though I still enjoy putting together a good costume every Halloween! My first goal is to create a Civil War ensemble. I finally have the good fortune to live within driving distance of several Civil War reenactments and saw my first one last year. Now I have been inspired to go this year in the most historically accurate garments I can. 
     I have lately fallen in love with fashion from the 1950's and made a couple dresses from a darling 1950's pattern. But I have decided to step back a hundred years, give or take, and try for something a little more challenging. The first step, undergarments, starting with chemise, pantaloons, and corset. I have made all of these before, but strangely never for myself. It's always so much harder to make a mock up on myself :( Will post soon with pics and progress!